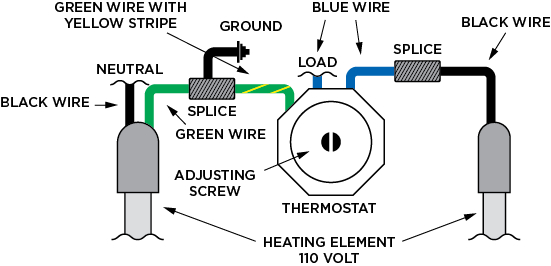
The thermostat is pre-set at approximately 45°. However sometimes during shipment or handling, the setting may become altered and must be reset. CAUTION: One complete turn of the adjusting screw on the thermostat changes the temperature setting by 80°. Several turns on the adjusting screw may ruin the thermostat and void the standard one-year warranty. Turn the adjusting screw counterclockwise (as if removing a screw) to raise the temperature setting; turn clockwise to lower temperature setting. Temperature range of thermostat is 0° to 175° F.

Safety First – This Unit Should Be Properly Grounded.
1) Connect one thermostat lead to one heating element lead.
2) Connect remaining thermostat lead to incoming hot wire.
3) Connect neutral heating element lead to incoming neutral wire.
4) Connect heating element ground wire to thermostat ground wire, then to a grounded stake.
In the event thermostat sticks or fails to function, which can occur after several years in service or after a period of non-use, turn adjusting screw 1/4 turn each way a few times. In many instances, this will activate the points and thermostat will function properly. If after this procedure the thermostat still doesn’t work, it will have to be replaced. IMPORTANT: Before replacing thermostat, check your heating element by following TEMPORARY EMERGENCY MEASURE INSTRUCTIONS.
If thermostat fails during freezing weather, water can be kept from freezing by wiring direct.
1) Disconnect electric power to waterer.
2) Remove insulation from thermostat (two solid color) wires and place two bare connections together and tape.
3) Replace thermostat as soon as possible as element will draw electricity continuously and heat the water.
CAUTION: Thermostat is screwed into 1/2″ P.V.C. coupling and should be turned only a little more than hand tight.
1) Open 1/8” needle valve.
2) Turn adjusting cone counterclockwise until a free flow of water emits from outlet. Adjust needle valve to desired flow.
3) Now turn adjusting cone clockwise until water stops and continue to turn approximately 1/8 turn. This should set unit at your pressure at a few degrees above freezing. (To test unit: Place an ice cube on the sensing coil. When the sensing tube senses the ice, water will begin to flow from outlet. Remove the ice-the water will stop.)
4) Fill water tank to your desired level.
5) Form sensing tube coil so approximately 1/2″ of the coil is submerged in water and the other 1/2 is exposed to the air at the point of overflow.